

5 Exciting Aspects of Adobe’s Auto Reframe
September 25, 2019

–
–
–
–
With Adobe MAX at the beginning of November, the anticipation is building for the announcement of Adobe Creative Cloud’s 2020 update. And if the new Auto Reframe tool is any indication, it’s looking to be an important update for corporate and event filmmakers alike.
Earlier this month, Adobe announced an exciting new Premiere Pro feature: Auto Reframe. This tool utilizes AI to detect subjects within the frame and reframe shots to fit a different aspect ratio.
Creating edits tailored for viewing on social media or other mobile platforms has been a continual thorn in the busy filmmaker’s side. Our friends over at Love Stories TV have been leading the charge for vertical crop in video. They say this is how you will achieve the highest viewership possible from smartphone users. In fact, Love Stories TV now requires vertical crop before they’ll consider a filmmaker for a feature on their channel. That’s reason enough to take the adjustment seriously.
In case you need some fancy numbers to reinforce the importance of vertical crop on social media, check out this article comparing performance between square, landscape, and portrait images.
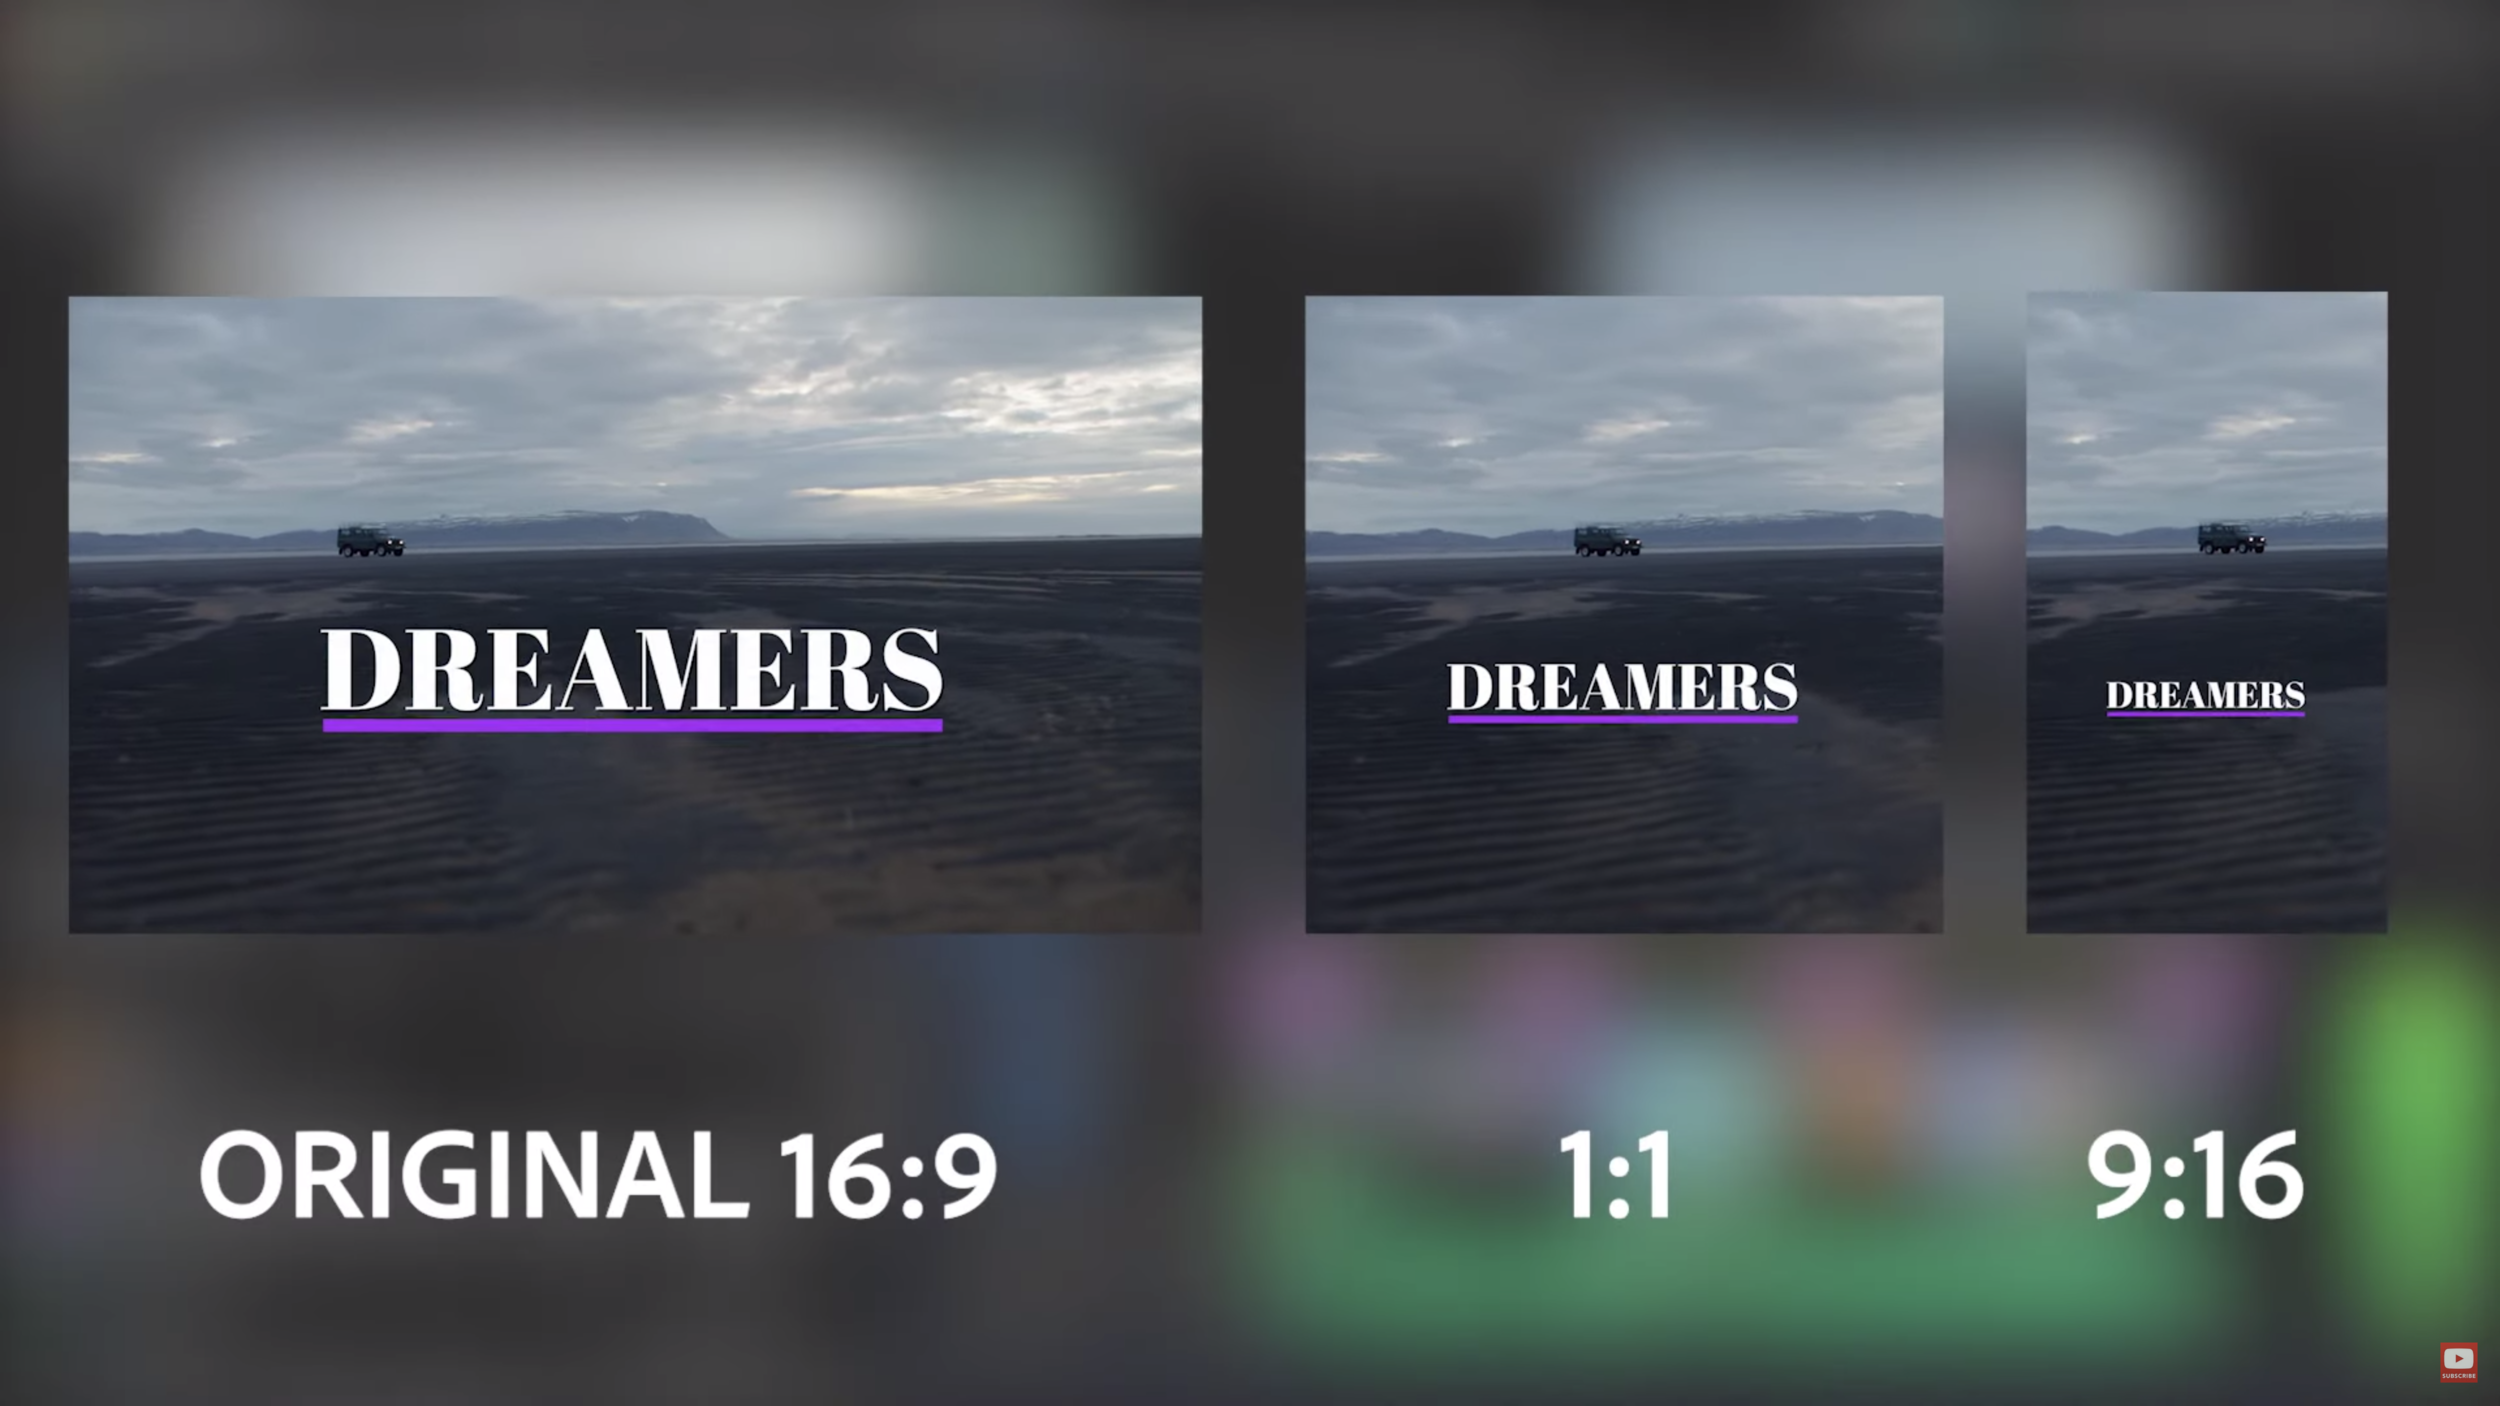
We get it. The art that filmmakers are so diligently and painstakingly crafting isn’t meant to be viewed in any orientation other than landscape. And the effort required to retool an entire project for portrait mode only pours salt into the already gaping wound. But Adobe plans to ride in on a brilliant stallion to save the day. A stallion by the name of Auto Reframe.
Because horses always have weird names.
Here are 5 exciting aspects of Auto Reframe:
1. multiple auto options
Like any good effect, Adobe is rolling out Auto Reframe with a few plug-and-play options to choose from. When applying the Auto Reframe effect onto a clip, editors will get the option to pick between different motion presets: Slow Motion, Default, and Fast Motion. We’re guessing these will play a role in how many/far apart the keyframes are when shifting the image around within the frame.
- More + closer spaced = Slow Motion
- Less + further spaced = Fast Motion
- More + further spaced = Anarchy!!
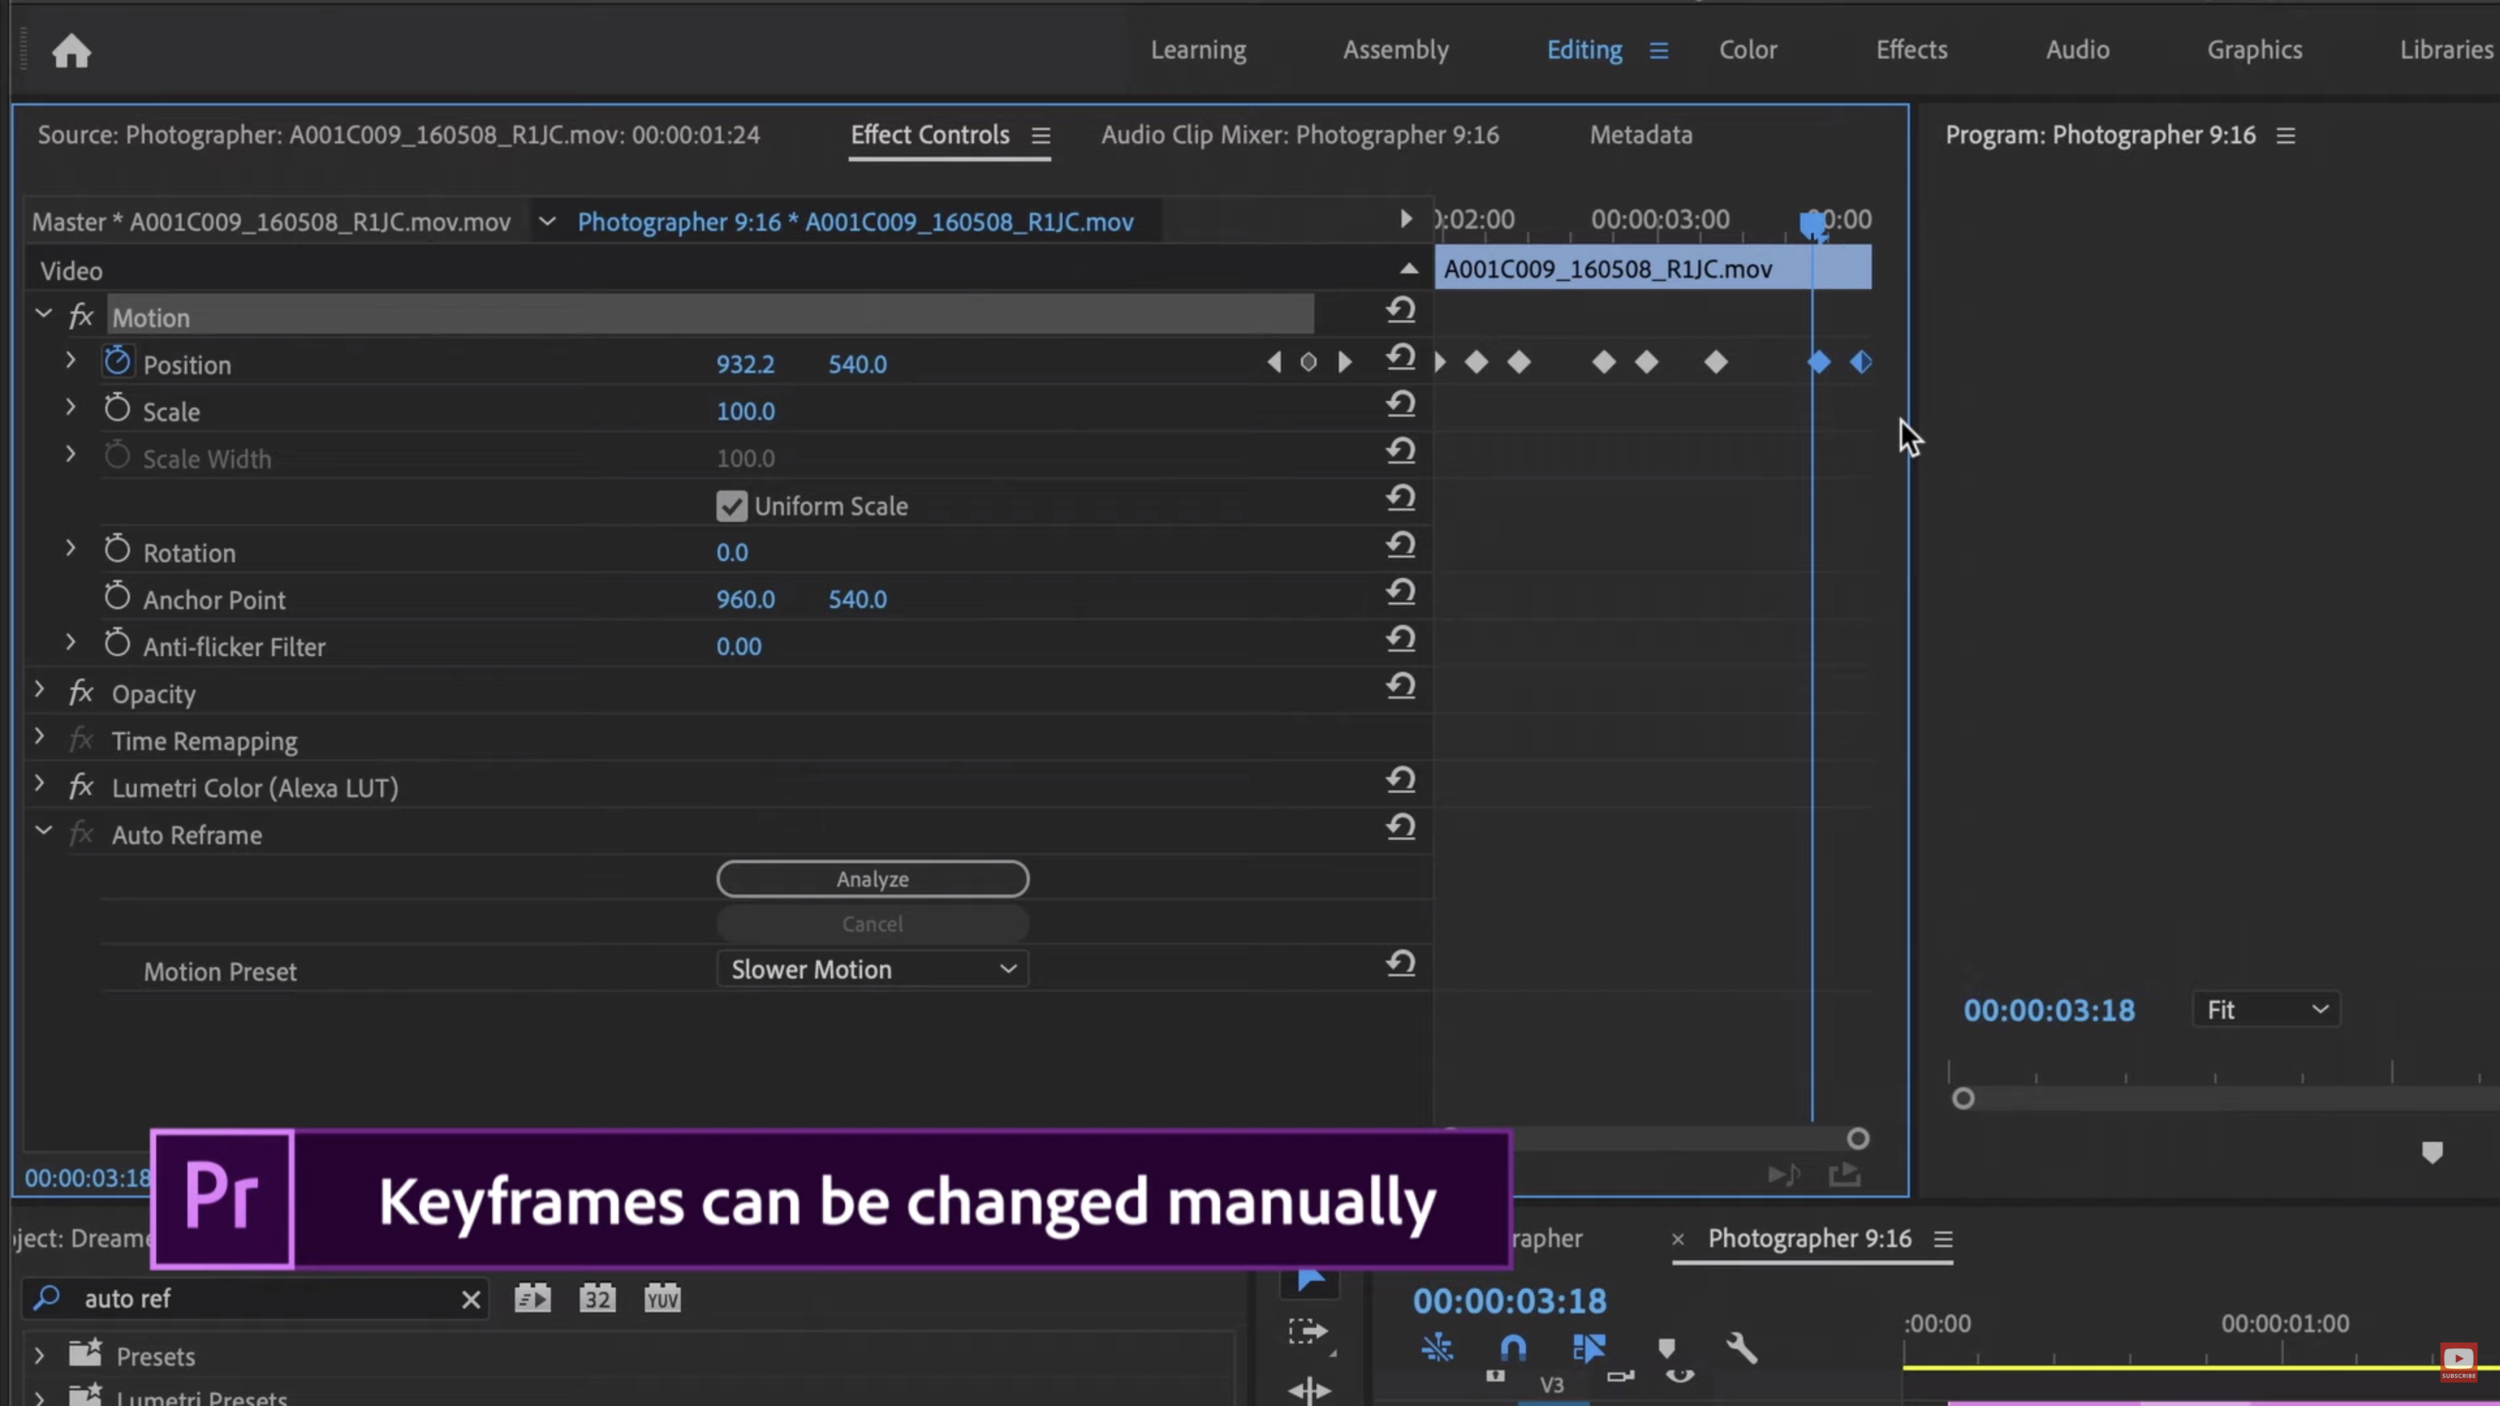
Auto Reframe utilizes keyframes as a means of shifting an image around – exactly how filmmakers have been doing it manually.
2. Manual Override
The new Auto Reframe tool allows editors to tweak the results, so the “auto” part of the feature still allows for “manual” adjustments. Unlike some other tools *cough* warp stabilizer *cough*, this won’t handcuff editors to whatever the algorithm spits out.
The reframing will be adjustable through the keyframe section of the Effect Controls panel, a workflow that should be familiar to any filmmaker who has added movement to a shot. This is super helpful if editors want a shot to start by tracking a subject, but then let that subject exit the frame. And Adobe is smart to enable this level of manual control to make sure this feature will appeal to filmmakers who desire control in the editing bay.
3. Batch reframing
Applying an effect over and over to each clip can get tedious. And if you’ve customized the effect to match a specific clip’s contents, Pasting Attributes isn’t really an option.
The good news is Auto Reframe will enable editors to convert an entire sequence to fit a new aspect ratio. Selecting this option will batch apply the effect to all clips in a sequence, while also augmenting the tracking settings per clip. Selecting “Auto Reframe Sequence” will result in the creation of a new sequence, preserving the original reference sequence. This is super helpful since if a sequence exists in a landscape aspect ratio, chances are the filmmaker will want to hang onto that sequence as-is for non-social media distribution of the actual video.
4. It’s so considerate
Man, Adobe’s really got our hopes up for how functionally-minded this feature appears to be designed. Auto Reframe will take into account the scaling and framing adjustments a filmmaker has already made to a clip so that you’re not doing double work or hacking Premiere.
Auto Reframe will preserve an editor’s existing modifications within the safety of a nested clip. This will, however, remove any transitions that happen between two clips. But a workaround could be to nest the two clips with the transition in-between, before applying Auto Reframe.
Nesting clips isn’t super common in an editor’s everyday workflow. It’s typically encountered when making speed adjustments or applying an effect like Warp Stabilizer to a 4K clip that’s sitting in a 1080 sequence. (However, Adobe has released an update for the Warp issue).
Nesting basically creates a sequence within a sequence so that you can make adjustments in a tiered approach. This makes Premiere happy since Premiere likes when clips match sequence settings for frame rate and aspect ratio. You can think about it like Inception–a change that occurs within a lower dream will have effects on all the dreams that it sits within. Is that helpful?
5. and it scales graphics?!
Another thing that’s got us excited for this new feature is control over graphical elements too. Since most people view social media videos without sound, it’s important for filmmakers to include text on screen during social media cuts. This can be particularly true of educational or “e-learning” content repurposed for social media.
Auto Reframe will uniquely scale and adjust titling and motion graphics elements to fit whatever aspect ratio you select for reframing. It’s unclear right now how deep this effect will engage with Essential Graphics created within Premiere.
We’re excited to see if the feature adjusts text spacing and line division, which isn’t evident since the video preview only showcases modification on a single line of text.

It’s a confusing world out there when creating optimized videos for social media. We’re hoping that with Auto Reframe, Adobe will relieve some of the burden from filmmakers already stressing to manage their projects.
With so much video consumption moving away from a TV or computer, it’s important that we all embrace the new aspect ratio. Rather than fight the trend and expect your audience to rotate their device, it’s better to leverage your creativity and take it as an opportunity to see film through a unique perspective.
Considering all the effort and development that Adobe is putting into this feature, it’s safe to say that vertical crop videos aren’t going away any time soon. Even if you hate vertical video with a fiery passion, the time-saving nature of Auto Reframe at least cuts down the amount of time you need to spend acting against your finely-tuned aesthetic taste.
It’s worth mentioning that at this point in the game, it isn’t clear what sort of export presets will come along with Auto Reframe. But Adobe is proving to be quite forward-thinking with the release of this feature, so our guess is that they’ll introduce optimized export settings too. It’d be pretty poor form to go through the trouble of creating videos for social media, just to fumble it at the 5-yard line.
But don’t wait until the feature drops to start pushing your vertical crop video content onto social media. Check out our free Instagram templates for both Adobe Premiere and Final Cut Pro X. These resources give you Instagram-ready export presets and will show you how to create custom sequence settings so that you can drop in your clips, reframe your shots, and export the final videos in the best codec!